How to Create a Bluesky Account
Are you interested in Bluesky account creation but don't know how to go about it? Find out the complete process of Bluesky account creation and discover how to create a Bluesky account in 2023 and beyond.
The recently launched social media platform is currently in its testing phase, but that hasn't deterred notable personalities such as Chrissy Teigen and New York representative Alexandria Ocasio-Cortez from becoming early adopters.
If you're interested in becoming a part of Bluesky, you'll need to register for the waitlist or obtain an invitation code from an existing user.
For immediate Bluesky account creation, you need to get an invite code from existing user first. If you've already gotten a Bluesky invite code, then follow this complete Bluesky account creation guide and discover how to create a Bluesky account:
Step 1 - Download the Bluesky App
The first thing is to download the Bluesky social App on Google playstore or Apple appstore. Just open your Google playstore AP and search for "Bluesky Social", or you can use this direct link to download the app on Google playstore.
Step 2 - Launch The App
Once the download is completed, click on the Open button to launch the Bluesky App on your device.
Step 3 - Tap the "Create A New Account Button"
Once the app is successfully launched on your device, a screen will appear where you will see an option to create a Bluesky account. Tap on it and follow the next step below.
Step 4 - Choose A Server
Once you click on the "create a new account" button, another page will appear on your screen where you will be prompted to pick a server. Two options will be provided, i.e a default Bluesky server or a custom server. Pick anyone that's okay for you, but if you would asked for my opinion, I would suggest you pick the Bluesky default server. However, the user on the screenshot below picked a custom server called Stems, so don't be surprised when you see his username bearing @ABC.stems.
Step 5 - Fill The Bluesky Account Creation Form
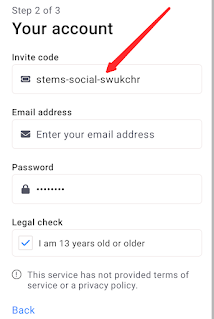
Once you click on the "Create a New Account" option, another page will open where you will be asked to input your Bluesky invite, email address, password and tick the legal check. (The invite code in this screenshot doesn't work, it's used only for illustrative purpose).
Step 6 - Input Your Username
The last step in Bluesky account creation process is to input your Bluesky username in the form that will be displayed on your device screen. This is the name that will appear on your Bluesky account and it's the name that everyone will used to identify you on Bluesky. The guy on the screenshot uses ABC as his username. Remember, in step 4, he had already picked "Stems"as his server, so now his username is @ABC.stems.
Had it been he chosed the default Bluesky server, his username would have been @ABC.bsky.social.
After you have picked your username, tap on the "Next" button. That's it, you have successfully completed your Bluesky account creation process! That is how to create a Bluesky account. Now you can login to your account and explore the amazing features of this new decentralized social media platform.
I hope this article is helpful, don't forget to support me by sharing this post to your friends on Twitter, Facebook and WhatsApp. Also visit this blog every for more interesting social media platforms updates.


.jpg)
.gif)

.jpg)


