How To Create Twitch Account (Sign Up Guide for Beginners)
Want to sign up on Twitch? Remember those late-night weekends huddled around the computer screen, watching your favourite streamer conquer virtual worlds and crack hilarious jokes? Now, imagine being on the other side of the camera, building your own community and sharing your passions with the world. That's the magic of Twitch, and creating your account is the first step towards making it a reality. This beginner-friendly guide will walk you through the steps of creating your very own Twitch account in 2024. Creating a Twitch account is easy and only takes a few minutes...Here's how you can do it:
For Desktop Users
- Head to the official Twitch website via https://www.twitch.tv/ or https://www.twitch.tv/
- Click "Sign Up": You'll find this button in the top right corner of the page.
- Choose your sign-up method: You can either use your email address or a Google account.
- Fill in your details: Enter your chosen username, email address (or Google account details), and create a strong password.
- Verify your email: You'll receive a verification email with a link. Click on it to confirm your address and activate your account.
- Congratulations... You now have a Twitch account.
When creating an account, please double-check that the information provided is correct before completing your sign-up. If you, at some point, lose access to your account and need to go through the account recovery process, having accurate information will greatly assist in that process.
For Mobile Phone users
 |
| Twitch sign up page for moblie phones - fadatechmas.com.ng |
- Download the Twitch app: Find the Twitch app on your app store (iOS or Android) and install it.
- Open the app and tap "Sign Up": This will be on the main screen.
- Choose your sign-up method: Similar to desktop, you can use email or a Google account.
- Follow the on-screen instructions: Enter your chosen username, email/Google details, and create a password.
- Verify your email (if you used email): Check your inbox for a verification link and click it to activate your account.
- Enjoy, You can now explore Twitch on your mobile device.
When signing up with your phone number, add your country code. Most phones will automatically add your country code for you; however, double-check, or you may not be able to receive text messages from Twitch to confirm your number. Also, please note that SMS and data rates may apply.
How to verify your email and phone number on Twitch (Beginner's Guide 2024)
 |
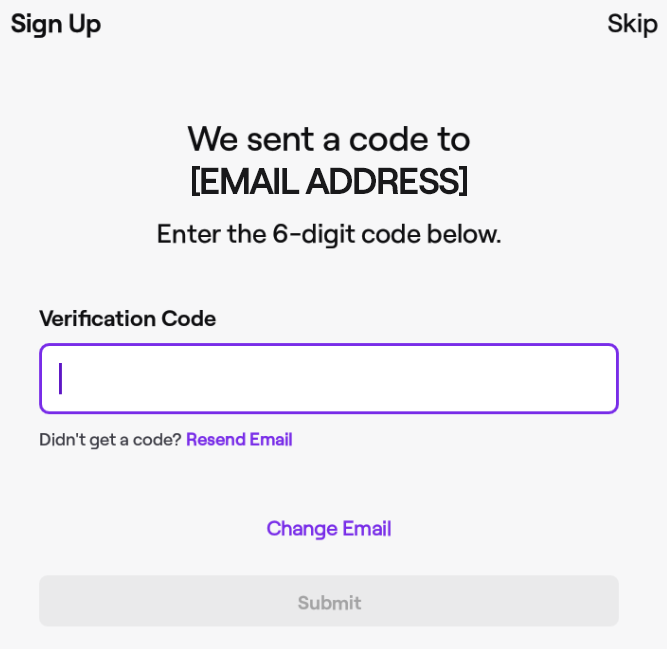
| Twitch email and phone number verification screenshoot - fadatechmas.com.ng |
When you sign up, we'll check the phone number or email you provided by sending a 6-digit code called a one-time password (OTP) via SMS or email.
If you used a phone number, your device might fill in the code automatically. If not, get the code from your SMS or email and enter it on the app within 5 minutes.
If you don't get a text or email in 5 minutes:
- Check the phone number and retry.
- Check the email and retry.
If you signed up with only a phone number, we may send important account info via SMS. Adding an email lets us update you about your account. Reply "STOP" to stop SMS notifications anytime.
If you signed up with a phone number, consider adding an email:
- It helps with account recovery.
- Enables notifications for channels you follow.
- Lets you chat in channels with verified email chat settings.
For iPhone Users
There are two ways to create a Twitch account on your iPhone:
Using the Twitch Mobile App
- Download and install the Twitch app: Head to the App Store and search for "Twitch." Download and install the official app from Twitch Interactive, Inc.
- Open the app and tap "Sign Up": Once launched, you'll see the option to "Sign In" or "Sign Up." Tap "Sign Up" to start creating your account.
- Choose your login method: You can sign up using your phone number (recommended) or email address. If using a phone number, enter your country code and number, while entering your email address for the email option.
- Create your username and password: Choose a unique username that represents you and a strong password. Remember, avoid using personal information in your username and password.
- Complete your profile: Enter your date of birth and display name (which can be different from your username). You can also add a bio and profile picture later.
- Verify your account (optional): To unlock additional features, you can verify your account using the code sent to your phone number or email address.
- You're in... Congratulations, you now have a Twitch account ready to explore the world of streaming.
Using your web browser
- Open your preferred web browser on your iPhone.
- Navigate to the Twitch website: Go to [https://www.twitch.tv/](https://www.twitch.tv/).
- Click "Sign Up": You'll see this option in the top right corner of the page.
- Fill out the sign-up form: Just like in the app, choose your login method, create your username and password, and complete your profile details.
- Verify your account (optional): Follow the same steps as with the app to verify your phone number or email address.
- Start streaming or watching... Your web browser version of the Twitch account unlocks the same features as the app.
Tips
- Choose a catchy and memorable username that reflects your interests or personality.
- Make sure your password is strong and unique to avoid security risks.
- Explore the Twitch app or website and personalize your profile with a bio and cover image.
- Follow streamers you enjoy and get involved in the chat to connect with the community.
- Join the Twitch community by interacting in chat and participating in events.
That's it, you're now ready to start your Twitch journey. Have fun and happy streaming...I hope this helps! Enjoy your journey into the world of Twitch.


.jpg)
.gif)

.jpg)


